One other new feature for creating logos and parts of infographics, which may be of interest, is the intertwine feature. This setting allows users to overlap parts of a design. It used the Lasso tool which, in the past, was used just to select multiple objects. However, it can select parts of objects to overlap when in intertwine mode. To start, select multiple overlapping shapes using the Selection tool (Shift+Click), and from the menu, choose Object ➤ Intertwine ➤ Make. Refer to Figure 8-183.
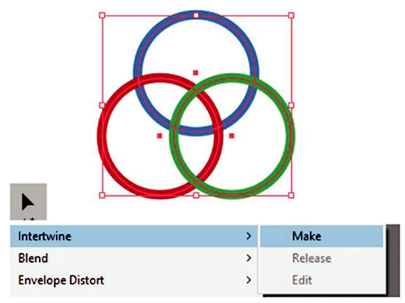
Figure 8-183. Use the intertwine options to edit paths so that they appear to overlap
Hover over a crossing area and then click the area that you want to intertwine. You can click this area again if you want to send the overlap back to how it was before. Refer to Figure 8-184.
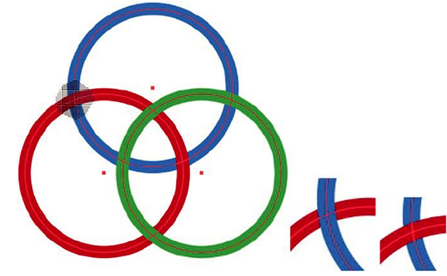
Figure 8-184. Intertwine part of a path so that it appears to cross over and then set it back again
Or you can drag over an area, and the Lasso tool will appear, so you don’t have to select it from the Toolbars panel. Then, when you release the mouse after the looping, the area will be overlapped. If you hold down the Shift key, you can make a rectangular selection. Refer to Figure 8-185.
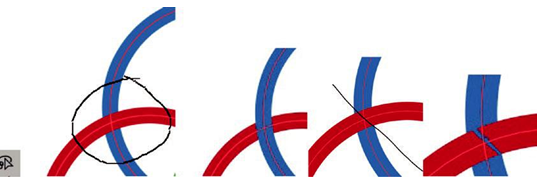
Figure 8-185. Use the Lasso when you drag in a circle to intertwine; if you draw a straight line, the intertwine is incomplete
Dragging out a line and not making a loop with the Lasso tool will cause only a partial overlap. Use Edit➤Undo (Ctrl/CMD+Z) or the History panel if this was not your intent.
Right-clicking an area will allow you to choose the order of the intertwine and bring areas to front, bring forward, send backward, or send to back. Refer to Figure 8-186.
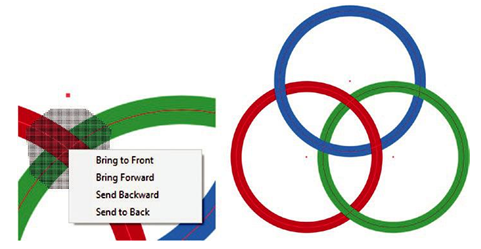
Figure 8-186. Intertwine selections can be arranged back to front
You can use Object ➤ Intertwine ➤ Edit if you exit the intertwine mode by mistake by clicking another tool in the Toolbars panel.
This can happen if you click off the shape. Or use Object ➤ Intertwine ➤ Release if you need to make the shape back to paths. You can also enter edit mode or release the intertwine when the item is selected using the Control panel or Properties panel under Quick Actions. Refer to Figure 8-187.
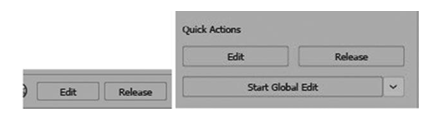
Figure 8-187. Use the Control panel or Properties panel to edit or release the intertwine
You will know that your object is intertwined as this name will show up in the Control and Properties panel. As well they are considered an intertwine group in the Layers panel. Refer to Figure 8-188.
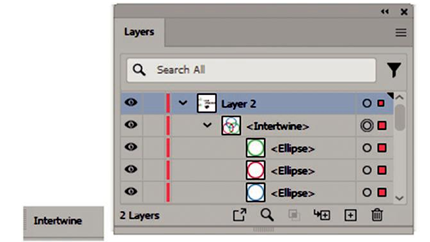
Figure 8-188. In the Control panel and in the Layers panel, the selected shapes are set as an intertwine
Adobe states that you cannot use intertwine for the following:
•\ Intertwine does not work with Object ➤ Live Paint, Object ➤ Repeat, and Object ➤ Graphs.
•\ Illustrator does not support creating nested intertwines or intertwines from already intertwined objects.
•\ Intertwine works best with strokes and shapes that have no fills.
Otherwise, you may be left with strange overlaps if you apply a fill afterward. Refer to Figure 8-189.
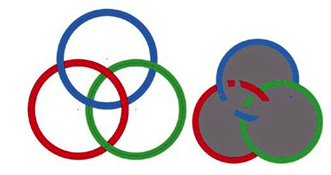
Figure 8-189. Intertwine objects are best having only stroke and no fills
You can learn more about this option on the following page:
https://helpx.adobe.com/illustrator/using/intertwine-objects.html
To make the intertwine permanent, use Object ➤ Expand and click OK to the following setting in the dialog box or click Cancel and undo that step. Refer to Figure 8-190.
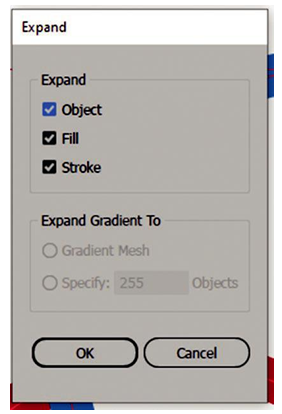
Figure 8-190. Expand dialog box for expanding an intertwine object to a grouped shape
Refer to file Intertwine.ai for reference.