This tool is great when you need to erase selected areas that you created with the blob brush. If you do not select a path, you may erase parts of your artwork that you did not intend to. Refer to Figure 8-174.
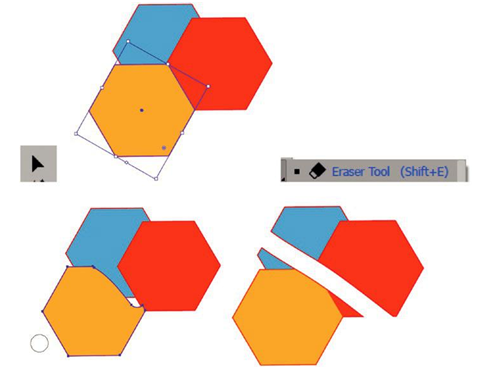
Figure 8-174. Use the Eraser tool to erase a selected path or through multiple unselected paths
When you double-click the tool in the Toolbars panel, you can access its various options in the dialog box: the brush shape editor and preview, angle (-180, 0, 180) degrees, roundness (0%–100%), size (0–1296) points, and the reset button. Like the Blob Brush tool, these options can also be set from the default of fixed to another setting with a variation (0–180) degrees for angle if you are using a stylus. You can also set a variation for size and roundness. Refer to Figure 8-175.
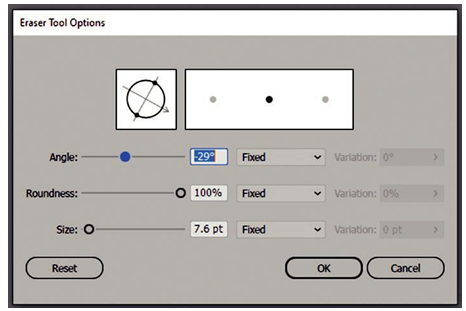
Figure 8-175. Eraser Tool Options dialog box
Outside the dialog box, when you want to set the brush size, use your left bracket ([) to decrease and right bracket (]) to increase.
Blend Tool (W)
The Blend tool is a way to take one shape or path and blend a transition into another. This can result in a transition shape that can be later extracted and used for building part of a logo or infographic. Refer to Figure 8-176.
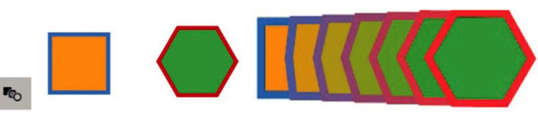
Figure 8-176. Blend tool and a blend created between two shapes
The Blend tool works best with basic geometric shapes with solid colors when you want a transition shape, but it can also be used with more complex group shapes in situations where a color or size change is required. Refer to Figure 8-177.

Figure 8-177. A blend between size and color
Click one object and then the other to create a blend with a spine. Note that on the second click, if you click a point like the tip of the star rather than the inside of the shape, this will alter the path. The square cursor changes from white to black when on a point. You can use Edit➤Undo (Ctrl/CMD+Z) or your History panel to undo this step. Refer to Figure 8-178.
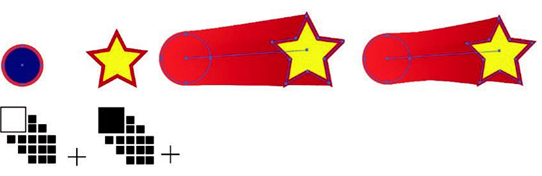
Figure 8-178. A blend may appear slightly different if the center of each shape is clicked on or on the second click on the point of a path
Options for this tool can be found when you double-click the tool in the Toolbars panel or choose Object ➤ Blend➤Blend Options.
Options include smooth color, specified steps in between, or specified distance.
Refer to Figure 8-179.
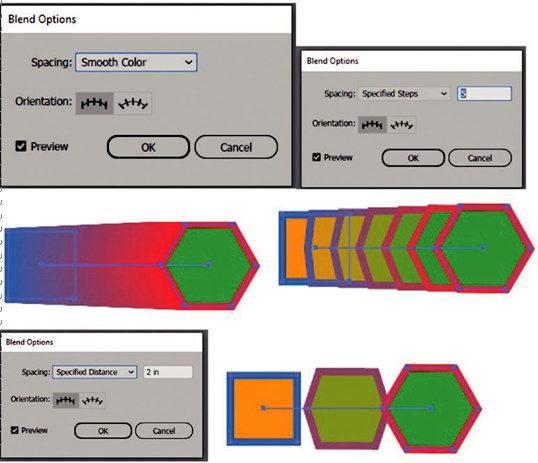
Figure 8-179. Blend Options in the dialog box and the blend that is produced
You can then set the orientation to Align to Page or Path. This is more apparent if a point on the path spine has been curved with the Anchor Point tool afterward. Refer to Figure 8-180.
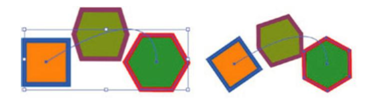
Figure 8-180. The blend on a curved spine will be different when the Blend Options orientation in the dialog box is changed
To release shapes from the path, use Object ➤ Blend ➤ Expand. This creates a grouped shape that you can Object ➤ Ungroup and remove the desired paths for further editing using the Selection tool. Refer to Figure 8-181.

Figure 8-181. Use Object ➤ Blend settings menu to expand the path to a grouped object and Selection tool to move shapes within the path once it is ungrouped
This area in the Object ➤ Blend menu also allows you other options to
•\ Reverse spine or flip.
•\ Release puts spine back to a path with the original two shapes.
•\ Replace the spine with another path when you have another path selected with the Selection tool.
•\ Reverse the blend front to back. Refer to Figure 8-182.
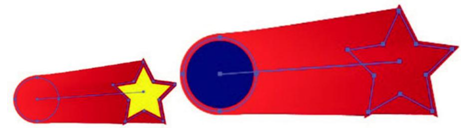
Figure 8-182. Blend with a reversed path
You can continue to experiment until you have your ideal shapes or blends. Refer to the blend_examples.ai file for reference.